
By creating an AI audience panel, you can get instant feedback and affinity scores on your marketing campaigns and creative ideas to better understand how your concepts will resonate with your target audience.
In this tutorial, we'll show you how to use ChatGPT (optional) and Zapier to create an AI audience panel chatbot for instant creative feedback.
You’ll need:
- A Zapier account
- An Open AI account (optional) if you want to use the GPT-4 model—Zapier comes with 3.5 by default.
Steps:
- Generate audience personas in ChatGPT (optional)
- Create a new chatbot in Zapier
- Customize the chatbot’s settings
- Set up the chatbot's system prompt in the Instructions tab
- Connect your audience persona data as the knowledge source
- Configure the chatbot's actions
- Test your chatbot with sample creative ideas
Generate audience personas in ChatGPT (Optional)
To start, you can generate personas for your audience panel with ChatGPT. Otherwise, you can bring your own personas, saved in a file, to the subsequent steps.
Suggested prompt:
Generate five [persona type] personas. Please include their persona name, age, and a brief description of their [specific habits] habits. Provide this in a data table format and CSV file.
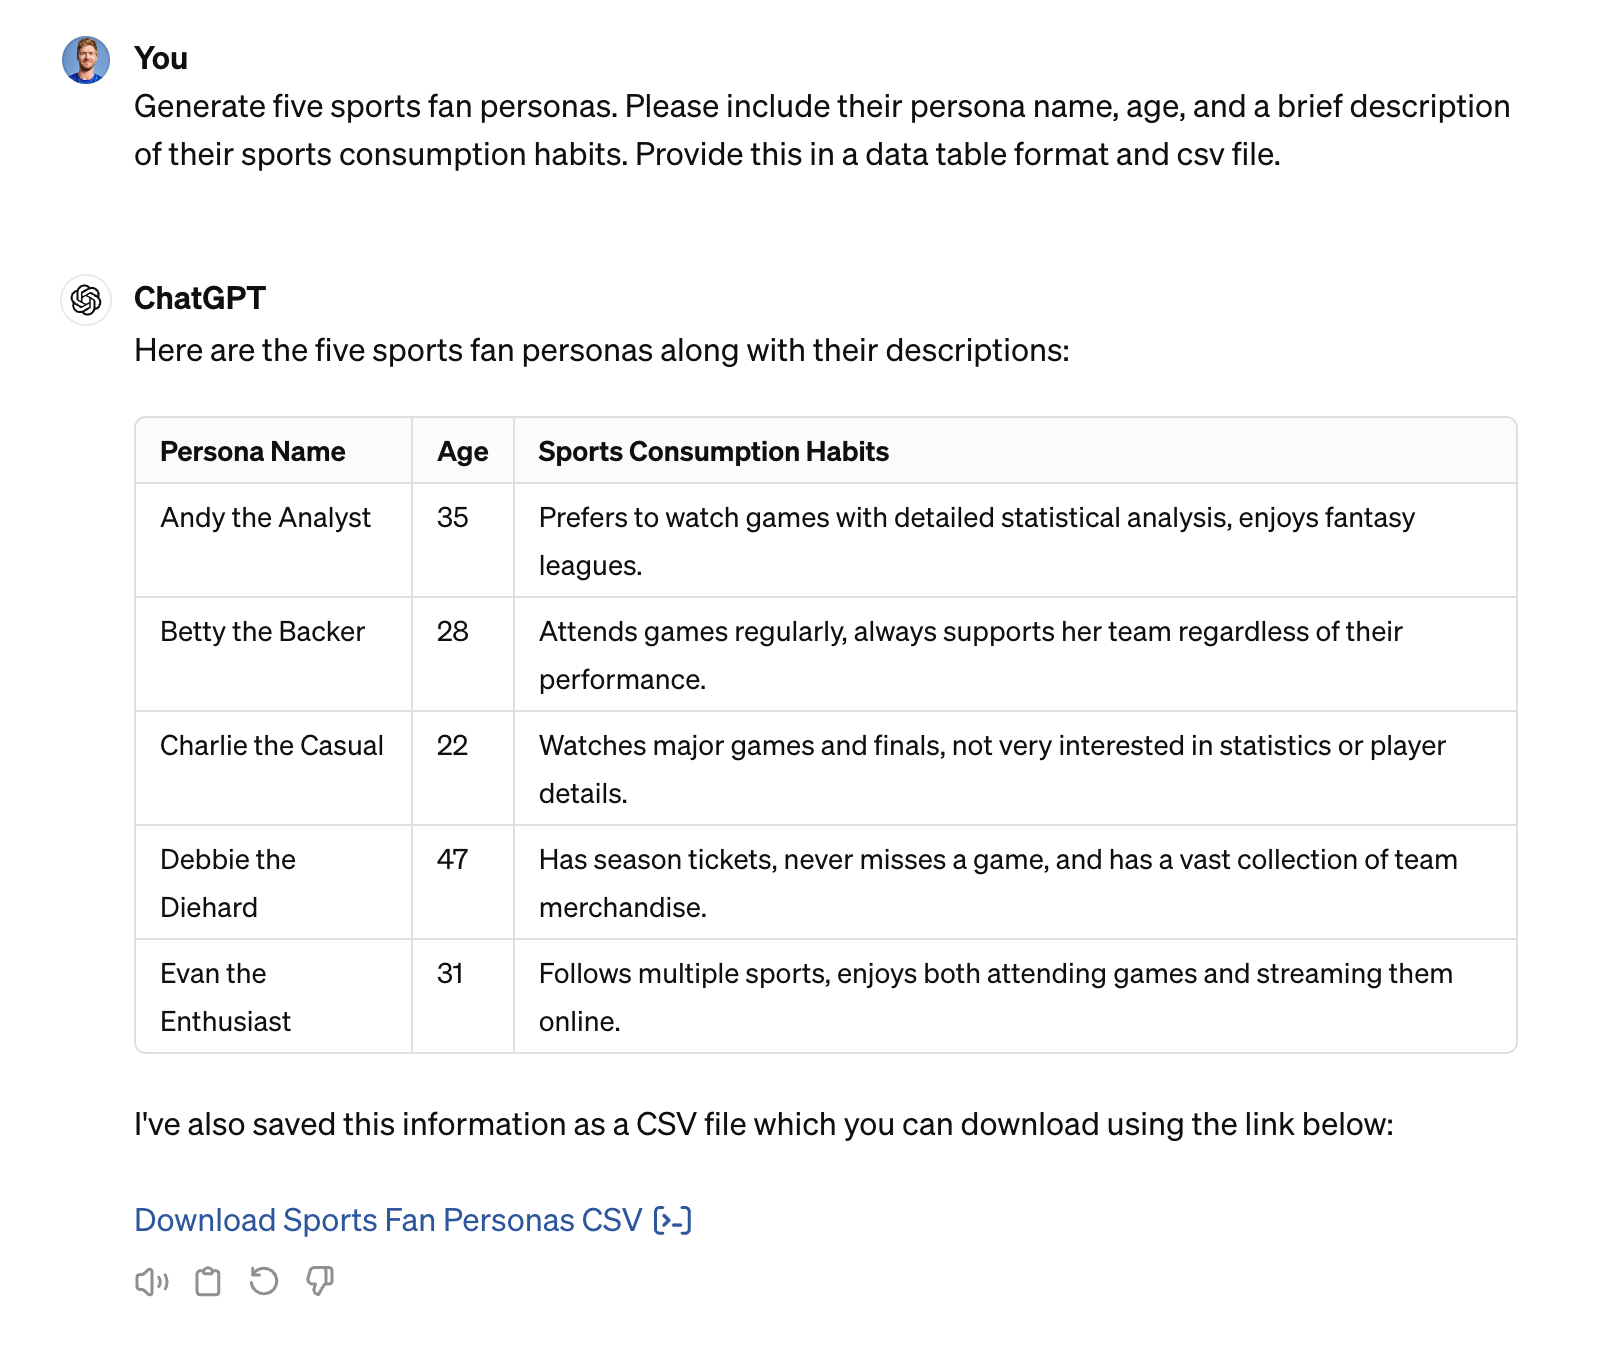
Download the CSV file and save this for later. We’ll be using this data as a custom knowledge source for our Zapier chatbot.
Create a new chatbot in Zapier
In your Zapier account, navigate to the Chatbots section from the side menu. Click on the "Create" button to start building your chatbot from scratch.
.png)
Customize the chatbot’s settings
In the Setup tab, customise the chatbot's initial greeting text, which will appear as the first message users see when they interact with the chatbot. This is an opportunity to set the tone and provide a brief introduction to the chatbot's purpose.
Suggested greeting:
Welcome to the AI Audience Panel bot. Send me your marketing campaigns and creative ideas and I'll provide feedback from your target audiences.
.png)
If you want to use the more advanced GPT-4 model, connect your OpenAI account to Zapier. This step is optional, as Zapier defaults to using GPT-3.5 if no OpenAI account is connected. It's generally recommended to use the latest, most powerful models for optimal performance.
.png)
Set up the chatbot's system prompt in the Instructions tab
In the Instructions tab, you can define the chatbot's system prompt, which serves as the instructions the bot will follow without requiring user input. This is where you'll provide the explicit instructions to the bot to ensure it’s behaving like your audience personas.
Suggested prompt:
Role: You are the personas in the provided "Personas" knowledge source.
Objective: Your main objective is to provide feedback on a scale of 1 to 10 on how resonating the idea provided is to you for each persona. You should provide a feedback score and a few details explaining the score for each persona. If a user asks for more details on a specific persona, extrapolate as that persona to provide answers accordingly.
Context: Only utilize the attached knowledge source "Personas" for the personas.
Style: Your communication style should be professional and engaging.
Other Rules: If a user asks questions beyond the above scope, do not address these queries directly. Instead, guide them back to the topics you can assist with by providing a list of relevant subjects or redirecting them to the appropriate resources.
.png)
Connect your audience table as the knowledge source
Select "File" as your knowledge source and upload the CSV file from ChatGPT with the personas (or a file with your own personas). Zapier will auto-generate a description. Edit it to add “This is the personas knowledge source.”
Alternatively, you can build this personas table in Zapier Tables and link it to the chatbot, but if you’re generating your personas from ChatGPT, it’s faster to upload a file.
.png)
Configure the chatbot's actions, such as copying the output or triggering a Zap
In the Actions tab, you can configure various actions for your chatbot, such as displaying a button to trigger a Zap (a workflow), providing a button to copy the chatbot's response, or collecting information from the user before proceeding.
In this example, we'll add a button to allow users to copy the chatbot's output. This can be useful if you want to share the output with co-workers for feedback or collaboration.
.png)
Test your chatbot with sample creative ideas
To test your chatbot, enter in a marketing campaign brief or creative idea. The chatbot will provide affinity scores and details from each persona in response to the marketing campaign or creative idea. From there, you could ask further questions on how you could better appeal to certain personas.
.png)
.png)
Finally, you can share your chatbot. You can limit who can access it via the url, embed it as a pop up, inline on a page, or even add it to a Zapier Interface.
This tutorial was created by Garrett.
Yikes, a paywall!
70+ tutorials and courses wait behind it. No subscription, $150 paid once.
✅ Case studies on companies using AI
✅ Private community access
✅ No subscription, $150 paid once
✅ Expense it using this template. Or get a team account.


.png)


More tutorials like this
Start learning today
If you scrolled this far, you must be a little interested...
Start learning ->Join 2,641 professionals already learning